DIY Harry Potter Wands
This Harry Potter craft will bring out your creative wizard. Follow our instructions to make a one-of-a-kind wand that glows! Just imagine the spells you’ll be able to cast. Lumos!
Servings 1 Wand
Cost $7
Equipment
- Hot glue gun
- Glue sticks
- Small piece of cardboard or foam core
- Super glue
- Saw or garden clippers
- Sand paper
- Paint brushes
- Tools to shape clay (knife, toothpicks, small piece of dowel to roll out clay…. whatever you have around)
Ingredients
- Sticks (dowels or sturdy twigs about ¼- 3/8th inch thick)
- Styrofoam (leftover packaging materials are fine…the thicker the better)
Electrical
- 3 volt 1.8mm LED bulbs (choose the 8 inch wire for a light at the back of the wand and the 14 inch for the light at the front)
- 3 volt coin cell holder with switch
- Hook up wire (just in case your wires aren’t long enough)
- Electrical Tape
Decorative Elements
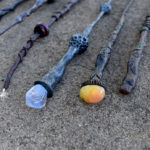
- Large rocks (I ordered these from Amazon. Some were translucent, some were not, they were all very pretty)
- Acrylic craft paint
Air dry clay (we tried Two)
- Creative Paperclay was easy to sculpt but results in a lightweight wand
- DAS Air Hardening Modeling Clay was not as easy to sculpt but had a better feel once dry. I also prefered the way DAS took paint
Instructions
- Plug in glue gun
- Cut dowels or sticks to be two inches longer than the desired length
- Determine if you want your light at the front or the back of the wand
- Insert battery into holder and completely cover in electrical tape
- Attach the battery pack to one end of the stick. If you want to light a rock at the back of the wand, place it about one inch from the end. If you’d like the tip of the wand to illuminate, place the battery pack about three inches in
- Decide where you want your switch. We found it natural to place the battery pack where the palm of the hand would naturally go and the switch where the thumb could easily reach it
- Cut a couple small pieces of foam core or cardboard to the width of the wand and hot glue them to the stick where you plan to place the switch. You want the switch to be at about the same height as the battery pack or a little taller
- Hot glue the switch to the foam core
- Tape the LED light to the stick, letting the bulb stick off the end a little.
- Connect wires, usually red to red, black to black, but if the colors don’t match up, make sure to test connection before moving on to the next step.
- Cover all of the wire and electrical pieces with tape, only leaving the switch exposed.
- Cover the area surrounding the switch completely with hot glue. Make sure to not get hot glue on the the top of the switch or it won’t operate. (This is to protect the wire connections from the moisture in the clay).
- If you’ve chosen to light the back of the wand with the lighted rock, place the rock in a bowl, or something else that holds it steady. Gently place the end of the wand to the rock (the LED end) and hot glue the rock in place. You’ll have to slowly add more glue until the rock is attached. If you’re using a polished rock, the glue is unlikely to hold it long term, so handle the wand with care.
- Cover your wand in clay leaving the switch exposed. It’s best to start with a thin coat and then add details. To smooth your clay out you can wet your hands a little, but since there are electrical components inside, use water sparingly. We found it best to go with the flow. The clay has a mind of its own, so try to work any bumps or twists into the design. Make sure to leave part of your stick exposed.
- Once you’re done covering your wand in clay, stick the exposed stick end into your styrofoam to let the clay dry. Be patient. It will take about 48-72 hours.
- Once the clay is dry, cut off the extra exposed part of the stick and sand smooth.
- Now you are ready to paint. Start with a couple of base coats and then use some darker and lighter colors to bring out the textures of the clay.
- If you’ve used a rock on the end of your wand and it’s come loose, reattach it with super glue.
- Once your wand is completely dry, you’re ready to perform magic spells!
Notes
- When the clay dries, it can shrink or crack a little bit. We found it easiest to fill in the gaps with hot glue.
- Test your rock for translucency before using it for your wand.
- If you want a brighter rock, you can wire two LED lights to the battery, but the battery will burn out twice as fast.
- As designed, the batteries are not replaceable. If you are making these for kids, we suggest you let them play with them for short bursts of time to make the fun last longer.
- We think this is a great project to make with older kids. Because of the electrical components, it’s too fragile for little ones to construct. Let them make their own without the electricity or have them paint a wand after the clay has dried.
- To disguise the the switch, dry brush on paint in very thin layers.
Some tutorials use chopsticks… they are not long enough for this project. Our finished wands ranged from 19-27 inches. - Our measurements were for adult wands. If you are delighting your little ones with wands, make a wand that will fit little hands.